

Azure Defender includes vulnerability scanners to scan images in your Azure Container Registry and your virtual machines. Sometimes there is an organizational need to ignore a finding, rather than remediate it. Risks may have been lowered because you implemented a security control. Or maybe your organization has decided to accept the risk for a specific finding.
After the recent feature to exclude specific recommendations, the option to exclude specific findings from vulnerability assessments has also become available. Disabled findings don’t impact your secure score or generate unwanted noise.
You can disable findings based on different criteria. When a finding matches the criteria you’ve defined in your disable rules, it won’t appear in the list of findings.
This option is currently available for the following recommendations:
- Vulnerabilities in Azure Container Registry images should be remediated
- Vulnerabilities in your virtual machines should be remediated
Consider scenarios like:
- Disable findings below a certain severity
- Disable findings that are non-patchable
- Disable findings with CVSS score below a certain score
- Disable findings with specific text in the security check or category (for example, “Security Policy”, “Windows Explorer Autoplay ”)
How to create an disable rule for a finding
If you believe that a finding should be disabled you can configure this with the following steps.
Please note that new disable rules applied to a subscription might take up to 30 minutes to take effect. New rules on a management group might take up to 24 hours.
Open the recommendation
- Go to the recommendation pane of ASC (Azure Portal https://portal.azure.com > Azure Security Center > Recommendations)
- Open one of the following recommendations:
- Vulnerabilities in Azure Container Registry images should be remediated
- Vulnerabilities in your virtual machines should be remediated
Create the disable role
Note that because a disable rule can contain one or more criteria, you have to create only one rule.
- Click on the “Disable rule button”
- In the newly opened “Disable rule” pane:
- Select the scope at which you want to apply the disable rule by selecting the checkboxes in front of your subscriptions or management groups.
Provide a value for (at least one of) the following criteria. Multiple values must be separated by a semicolon “;“.
- Finding ID
- CVE
- Category
- Security check
- CVSS scores (v2, v3)
- Severity
- Patchable status
- Optionally you can provide a justification containing details about this disable rule.
- Click on “Apply Rule”
View disable rules
- To review the disable rules that have been created click on the “Disable rule button” on the recommendation page
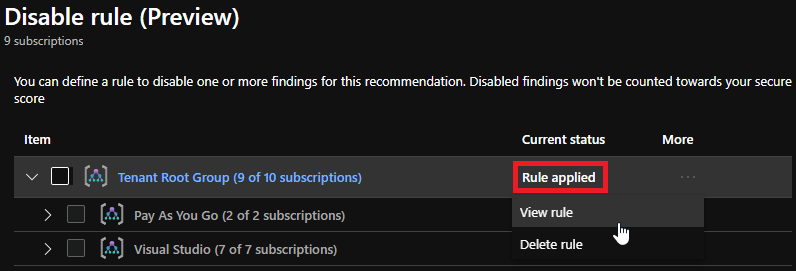
- Within the scope area of the “Disable rule” pane, you are presented with an overview of all the existing disable rules. Each level (subscription or management group) at which a disable rule has been configured, has a “Rule applied” status.
- To view or delete a disable rule, select the ellipsis menu (“…”) next to the status column. (The “view rule” option does allow you to create an override on the existing disable rule)


For more information about the usage of Azure Defender for container registries see the following documentation
https://docs.microsoft.com/azure/security-center/defender-for-container-registries-usage
How to view and remediate findings from vulnerability assessment solutions on your VMs
https://docs.microsoft.com/nl-nl/azure/security-center/remediate-vulnerability-findings-vm
The Azure Security Center release notes of September 2020
https://docs.microsoft.com/azure/security-center/release-notes#september-2020